My take on the brewmaster rotation


This post will cover the following:
- Why the rotation is hard
- Basic brewmaster priority
- Damage per cast tables (AOE and ST)
- Exploding keg interactions with BdB/SCK/RJW
- Tips on min/maxing single target and AOE damage
- Links to other resources/videos
- List of Acronyms
I came back to the game in Dragonflight. Brewmaster had changed a decent amount since I had last played, so I went looking for some updated rotation resources. I found a lot of conflicting information and also found it difficult to actually put the guides into practice. This post is my attempt to reconcile some of the initially confusing things I encountered and have subsequently solved.
Why the rotation is hard
Basically, the rotation is hard because even with a 1 second GCD you don't really have enough globals in the opener. You have a lot of things to get done in a short period of time and multiple competing priorities. First, you need to get threat. This may mean sending a keg smash or explosive keg earlier than a DPS priority would recommend. Second, you need to use your offensives/defenesives - many of which are on the GCD (WoO, CB, EH, BdB, EK, statue, ox). Finally, you need to set up damage with WoO without delaying your explosive keg too long to make it not even worth.
The competing priorities of threat, defensives, offensives, and DPS make it difficult to know exactly which button to press next.
The Basic Priority
Assumed talents which reflect my personal playstyle:
- Sal'salabim's Strength (KS resets BoF)
- Bonedust brew +/- bountiful brew
- Dragonfire brew
- Not charred passions
- Not blackout combo
Prepull: make sure RJW is up
- Get threat with KS, BoK, BoF, SCK, or EK
First and foremost, you need to have threat - end of story. Typically, this means using a keg smash and sometimes an explosive keg early in a pull. This is without question a dps loss, but threat has to be the main priority, so send it if you need to. Keep in mind that healing potions generate a large amount of aoe threat at range, there are many situations where this can be useful. Potion of shocking disclosure can also be useful to help with uncapped aoe threat (which brew kind of struggles with). - Use weapons of order when you won't waste a breath of fire or keg smash reset.
I usually press weapons of order after I get initial threat, have breath of fire on cooldown, and have keg smash on cooldown. - Combo BdB -> RJW -> EK -> SCKx2
Hold for weapons of order stacks if this cooldown is up. It's also good to save this for priority or aoe packs as appropriate - don't hold too long though. Optimal timing comes with experience. - Apply bonedust brew
Sometimes you hold bonedust brew to combine with explosive keg, and that's totally reasonable. I wouldn't hold it for any more than ~10 seconds (without WoO stacks) or ~15 seconds (with WoO stacks). It's also important to avoid over-riding bondust brew applied by bountiful brew procs. This talent procs a LOT so it's important to keep track of this debuff. - Breath of Fire
The sum of the initial hit, DoT, and DfB procs makes breath of fire our highest hitting rotational ability. Keep in mind that the ability can hit targets at range, so if you have to move out for a mechanic, then you may still be able to use this ability. It also applies a 5% damage reduction debuff. - Keg smash if it's not on cooldown
The area of effect on keg smash is actually smaller than you would imagine. It's worth testing out the aoe on it. Always try to target the mobs in the middle of a pack to avoid missing mobs - this can lead to threat issues. It's quite nice to have stacks of hit scheme (talent) to buff keg smash. This is why it's good to press a blackout kick before keg smash if you can spare the globals. That said, if keg smash isn't on cooldown, then I would recommend just pressing it without a hit scheme buff. - Blackout kick
This ability synergizes with hit scheme and shadowboxing treads to do good 3 target cleave and also buff your next keg smash. On 3 targets, blackout kick will do more damage than a rising sun kick. It also gives you a stack of mastery, so on lower targets it can help you dodge melee swings. Lastly, blackout kick has 3 chances to proc spirit of the ox (talent). All together, it's usually better to press blackout kick instead of rising sun kick if they're both off cooldown. - Keep up rushing jade wind
RJW procs resonating fists a lot. Especially on AOE, RJW causes a LOT of damage. It's also really good for threat and pickup. Especially in M+, your RJW uptime should be at least 70%. Special delivery is an alternative that is easier to play, but in my opinion, it's quite a bit inferior from a combined damage and utility perspective. - Rising sun kick
Although I'm placing this farther down the priority, by the numbers, RSK is actually our highest single target ability. For priority damage and single target, this is actually one of the best buttons to press. I typically still use blackout kick first because it has a shorter cooldown and for a few other reasons as discussed above. - Spinning crane kick / tiger palm
Lets be honest, both of these abilities hit like a wet noodle. Use them to fill. SCK can be helpful to get aggro on incoming adds since it's spammable - but it's threat modifiers are quite small and it suffers from aoe falloff. Try not to fall into the trap of just spamming SCK when RJW isn't even up. Tiger palm also has the benefit of reducing brew cooldowns by 1 second (2 if BdB is up). - Chi wave
The best thing going for chi wave is the 40 yard range. Press it either to pull something or because you literally have nothing else to press.
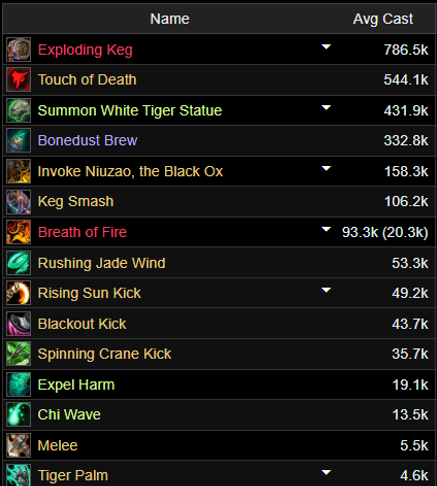
Damage per cast (trash)
Here is a representative sample of relative damage per cast for TRASH in a mythic plus dungeon (10.0.7)
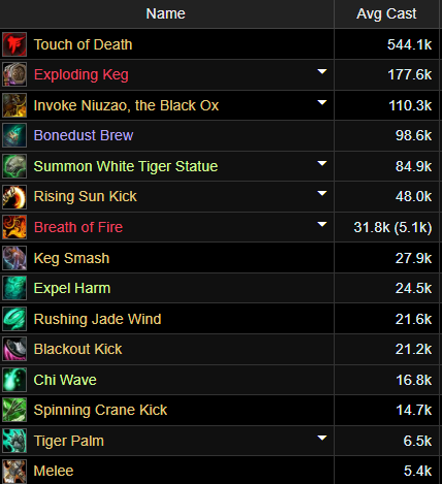
Damage per cast (boss)
Here is a representative sample of damage per cast for BOSSES in a mythic plus dungeon (10.0.7)
Exploding keg combo
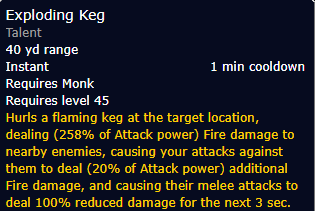
The combo hinges upon the 3 second debuff which causes additional damage when they are hit by an "attack."
Here are some things that count as an "attack"
- Spinning crane kick tick (4 per cast)
- Rushing jade wind tick (~2 ticks per second)
- Any normal ability (like RSK, BoK, TP, or whatever)
- Any bonedust brew proc
It's important to note, bonedust brew can proc explosive keg, and explosive keg can proc bonedust brew - so they can actually chain off of eachother.
So, bonedust brew up, RSK up, and press EK followed by 2x spinning crane kick casts, then you're going to get 10-15 "additional damage" procs per mob. If played correctly, the "additional damage" is usually about equal to the actual upfront damage. Playing the combo correctly essentially DOUBLES your exploding keg damage.
Keep in mind that the combo takes a lot of globals, so be careful to not let your weapons of order stacks fall during the setup/combo. Typically, this shouldn't be an issue, but pay attention to this as it certainly can happen.
Tips to min/max damage
First and foremost, you need to stay alive, have threat, do mechanics, and have good routes. This should be your number 1, number 2, and number 3 priority. If you need to kite to live, then your damage will be lower - but refer to priority number 1.
That said, ALL damage matters, including tank damage. An additional 10k overall dps (or good prioirty damage) from the tank can easily cut down 30-90 seconds off of a key timer or help make a breakpoint to save a bunch of time.
Keep in mind, priority damage is QUITE under-rated in general. A pack of mobs dies only as soon as the last mob dies. If you have ENOUGH aoe to kill lower HP mobs, then only the damage on the highest HP mob actually matters. Make sure you're attacking the priority target, and make sure to be using RSK on the priority target. As long as you can survive the pulls, this also means it's actually worth using explosive keg on lower mob counts to make priority targets die.
In mythic plus, the priority target is whatever mob is stopping you from chaining to the next pull. Usually this is a caster, some variety of a rooted mob, or a dungeon specific gated mob (door doesn't open until mob dies). If you can kill a bunch of small adds, and chain the high HP mob into the next pull without dying, then the idea of "what is the priority target?" is different.
As the tank, it's your job to mark a skull or otherwise remind people to "kill even" or "hit the high HP mob."
- Ramp your weapons of order as quick as possible with keg smash AND rising sun kick (also applies aoe stacks of WoO)
- Weapons of order buffs trinkets and potions - so hold for 4 stacks for an additional 32% damage on them (try not to wait more than 32% of their cooldown duration, else you're then losing damage).
- Hold white tiger statue and Niuzao for aoe packs. The single target damage from statue is not very large, it really scales up with mob count. Unless you're going to lose an entire use (like if boss lasts >2 minutes), then it's reasonable to hold it until an aoe pack.
- Use shocking disclosure over elemental power potions for maximum damage.
Do this if you're just going for damage. - Use elemental power potions over shocking disclosure for survivability + damage.
Do this if you could potentially die or have to kite. Kiting is a MAJOR dps loss, so if you can stay in beacuse of an additional 700 agility, then this is worth it. - Consider using fortifying brew to increase your touch of death damage. You can also have a warrior use rallying cry to boost it even more. This combo can nearly double your touch of death damage.
Links to other resources and videos
A lot of these resources do not discuss how to handle weapons of order or the exploding keg combo, so following the priority blindly can be the incorrect way to play. Always get threat, live, and do mechanics/route! THEN focus on damage.
- Quazi guide - Youtube
- Equinox opener/combo instructions
- Peak of Serenity guide
- Icy Veins Guide
- Wowhead guide
List of Acronyms
WoO - weapons of order
BoK - blackout kick
BoF - breath of fire
EK - exploding keg
KS - keg smash
EH - expel harm
BdB - bondeust brew
TP - tiger palm
CB - celestial brew
PB - purifying brew
SCK - spinning crane kick
RJW - rushing jade wind
DfB - dragonfire brew