S2 Routes - Updated 5/15

Changelog
- 5/12/2023: updated the VP, NL, BH, Neltharus routes after the nerfs to these dungeons.
- 5/15/2023: updated HoI kick priorities, small wording changes/clarifications, added neltharus blazewing skip and changed route to go elephant first with lust, added slag erruption weak aura export (for neltharus), updated VP boss strats and added a new route that skips the star pack. Updated neltharus lair boss strats.
Routes are going to evolve heavily over the next couple months. Here are some routes that I've found work well for my groups along with a couple comments about specific pulls/mechanics (and how much experience I'm having with each dungeon).
Halls of infusion
I think which route you do here depends on how much poison dispel, mob control, and range dps you have in the group.
On a side note, especially on tyrannical, this is a full send brew dps kind of dungeon. Nothing really hits hard here except buffed proto-dragon frontals. This means dps annulet ring, dps trinkets, and training of niuzao. If you're dying, then go back to light brewing.
At the start, you can go left or right around the circle. I found left to be easier, but keep in mind the runback shortcut is right. The defenders each need a kick, and you need to make sure the Containment Apparatus' don't get any Expluse casts off.
I assign one person to do stops for each Defender and Apparatus - it can be a short kick, long kick, or stop.
The Apparatus' do a LOT of damage to the group - you need a lot of heals and send stuns/stops when pulling more than one.
After the first boss (Watcher Irideus), you can either go upstairs (easier) or downstairs (faster). The upstairs route has more dragonflies, which have to be kicked, and the downstairs route has more swoglets (which have stacking poison that kills at 10 stacks).
The first boss is basically a dps/heal check. After the first intermissi0n, the Static Charge circles are a lot bigger, so dps have to drop them farther out. I would definitely lust first boss here on tyran weeks.
Frog boss is easy - just make sure the tank gets eaten by the circle (Gulp) or else the boss will get enraged.
Third boss is a major healer check. Make sure you're not standing near half broken ice blocks (even if also behind a good one), otherwise you'll take extra damage and be deadge.
Last boss is actually not too bad, people just have to be patient, the waves are a one shot (as they should be). Keep in mind that the 4 mobs channeling around the boss buff it permanently. My group would CC two and kill two – then kill the other two. They can't be kicked after you stop the initial cast - only stunned/disrupted. So depending on comp, you may need to do one at a time. I think in the very near future, we'll be doing all 4 of these at once no problem. PS: do you think they scale with fort or tyran?
Default (upstairs) MDT - easier
!TA1sZTTnq4Fo9sTkXBWJnj1TzMw3mdZ0PN4ikrqjgtrQYhXXx0V9U7cscqf3B1Y2c8Jy3V9nqol)Z5zL1vv1hNAgFn)jgpp7fN7zyvEwrzzx7F56hQ7AZFsMi05zt1L5zzp(4VvXA(7x4f5zFTOzYH654uFVRD8ttnn5pPwFoB6qJ7Road0DFD14Fwvn4gharEc5Fe(SS3pm1EY11(XYVb8LMNn6CxQBpLFipBW14ooIwcjhqai2vGRvfT8VNeivpjHnaFhdXriXmKKGeiKCgITURSJDnD95zvvcxvvKMwih3OM0RjMhVsvX8ONH87f3HLEmnM5GjVWmYBQlsrZMycTtljs6c1Z7ksHKjy8yw6Ryxs4I27SI3eVSXEaZ7vSTXkVHWyBS505OLAJQ9HaMHmAMAJA8EoBBqV6G3c1uDviGaOe2AM6jKEioCF(JC9yiKzbvR5FL9oTS8(vD99zeKEFgXgRbZCTqePwck17Ujuo3CxQ1hM8K57cWDUnpLIrHvdYRuZsy5TkdxuIxLE3pG5Fkyelv20MxGly(OmtSgGgPCwS(cvTEo5rkyUJbt6brgNv4Df3Hnf1FUYSynbh4m08gBvI8VR8oyK81ezGo5SsvBuQkKjxvTxULC9srFO8a)13BRPfgAbKRGOkwbSPWEU)iyBQnwL)P0nXnA64O7BKsMUEP82(hUT)60PHB7l6D32p0b)nnmZXNkACJJUp2w1HH7IPXU3J44q03D3EOHSO67o8fy066C0Ss)QhLwMqMQucTrWygEE1dsAuWJpOTjjjAntXmwbSaFLpmqXS3rha85ZUbWchFbmXlDhalUFQ92(PRa2z00hlQ7hqlOfKyE6Zk7gPXYtTcKABIwmtbYUjXKiekoAEwMwHVsFp7)sXXZ32)bxLRT01dC7(NP6EhyfDTa5xHZ16aRzemUNRp(8UB7Zo31p6F62(AyJUIHxb8FVR90c8l1nnR6csbOxm1(tL1dJ9txh96RI2eKNE5CnAedN7MAkB)b41hqHAr1pm52f57IT(oNPSSeRuPLsMo23TCLYAy2ujeGGkP3Y3FFxleBBVahPEB)pF9ArFX40WpCBpCGoAfhlggXCc6cJNr7HIjUVDTzctzfJlPOIl4wQX))WDrUJOCtdtfnnVo7ydd1NADL(OWWyNptFHKDOdvYHIJpJfaxkMLP15krjqn2u0FctvxHnnehCKBcocT1Q5wTbcnSeEuWXQtKjkHuGHTu7BhC(vx3LI2JGxm3c9vx)R(K9ps2l8WxMWauzh(x5Pc4gmG)w3FSXTXUur21Y8QDS7jSI(Hgm8GfhrGYM14fltXe7OXkzpW5sCPaats3rxwabT4s1kOoaAqqZo6ofaOGJGPRGW4QvugsvIIGjUegKlMialJGj68cs8jzeSjaBJGjkPLCIsPzhgnybyEemrzYo8wbeLk(oysjxfG1rWgpmkirPYRK0vyrsawWwvIGOuZO1bkfYiyL3aXBtruQveSjaBJGjk14sjrP2IUMKfG5rWiLmsjszeSkaRJGrkzAS2rANHb3bVd8mSkjaRqk5jOGkEeSialJGrkHkl8KkDeSjahrPcPeQUayDeLAwaoIsnsjuGHWruQvb4ik1iLcjTmqjDuS()JojbLv9MNGsziOANAUtcYJCFNKhuhajllfb9gMzh33j5b9DsEuQtYRaFNKHOLfiZ3jndR8ggFPtYiP2hta2gbtuMe6KmQDZ3aYepdeIIWrWPkyoG0Au0beI5zGwJovLif2edC(4BF08Fu0)S)inCiyBjELc8mRr)r2)3hrB3CbbDctMyKjwDkhEiYkmPwUXizcJrzTjQ57oC3KyA(6lTEwUT)SR3f4c)K)Vp
Downstairs route - requires dispels, mob control, range dps
!TEvtZTTnq0Fl9uUuZs8n4X8rDAMP1nZWmD6joIsc0IruKQ8J44l63E3DbijOJ7TAzlr(0I992hawqxWk(sr(X6QQ6dtnJpx8aJxK)KZDgUQiV84XU2)Y1pu31w8GmvOlYNQpwKNF)9)wfR5VFIxwK)TYMjhMNdt99U2Xpp10u8q2Y95t7BCFZ1qPSVUA8pRQgCJdWqEa5FeEnh7hMAF011(PJFh4dsXOZDPU9XI9f5dUg3Hruj04acGHDf4AjrZV9GO4bomEia4ZyiocjcqscsGqYaeBjQ8dDnD9f5vvcxvvuM8bQOa1uEnX84tQkMhDaYhlgHLUnlM5vjpZmYBMlkrbjMsrAPHKntDiQOessW4XS0hXLKWffBiXB8lBCfW8vfBRx5fcJTrZzb3sTj1ElGzirZuBsJVYzBn9Q9EfQXO0)406RwyOJbddCLvlielf5sDzM5MnZnPlbn5WYOzhuZAVMHFzwYY5Py2FGpx(8qoK(KWvH6rh8mdvT01Khy9jKl8zKCI4Pf)8TnwWapJ(sABH6TzFP63fHHUDEoBFSDyPI1SyRVYY45K4tPFhXkM)UvrmVZGcEgUK5NeyZlEO9Cm1M8TUQ3ZjpkbHDCOHToKXqcFXMJ1GI2FVWCyLvy4Eox38hRkrXpS9yvK81LDl0jdjvTjPZ2zCQ9JlA20RPLfZ4V(EdA6cdDbU4GrR12SXiS)AvBQnQYFx2gFJ6Uo6(oLKPRxoEB3D32DD6XHB7k7D32n0b)nne44ZLnUXr3NAR6q7UCAS79io2e(DVigQjnM(U9FfAnV0ho)O)Q7LwMqMPucTrWygEr1DsQvY93PTPPPAntXmwbCb(vEBG8S3Hft(xo5gafo(eiXlD7bf3p1EB30va7ek9XY6(bubTWicDVwy3inwEMvGuBt1Iafi7MutQqO4O8SmTc)k9lz)xlpC62Up4QCThD9a3U)zQU3bQORfi)kCUyhOMrqCNRpCo52U8tD9J(7UTRgc0vo8mG)7DTpod)uDtZsUGPaSkMA)LJ1dJ9txh95RIccMNE6unkIHtDtnhBFd817Xb1IPFyYLev7IT1oNPSSuRuPLsMoU2TCLYAy2mjyqWkPxR2FFxl4TTxGJKVT7TxVw2xoon8MB7GhiavXHYHrCoblHXtOEipX99Rnt4uw548uu5fmKA897EHZDah30WuztZZHcByO(Xw3rVlmm25NPVqJDOdtY(YdNXfaxkdJP15oIJaZytz)J4u1viOHyZrUXCeARvZTAdynSuEK5y1PYuLqkqBlZ(6MZhDDxkBpavryl03C9p7NS)zsVWnFDcnOJD4FhFSeEciOER7p042OlvKUM7xLWEjHv0puJH7SylcCS5n(HLlZej0qZVJZ0j0HS5sRojdZaaYzjutMzq9kObbzj0duGG6en9OBbqOD1ckdPYit8hycWcoMbMyfwgbJ0PTj(t(qytI)40fyBemsPwK4pIfGLcmeoBfMhbJuQtjyIsvkbRwH1rWiLQm0v5eLknfs2cSiDfwGuQSjqFAbrjqp6OIvyzemsjmqW(feL6SeSlMzf2gbtuQqkLeLgws4eq9)hRda3rfwheKhcAqqsZM0eMFDGhuVcscMwgr61iss9Rd8G(1bEuADayZI51b(mWeRWrS5xhWPjzVdztYkwEUSL9KyJkdh6uBsHE1gz0rfkHrH7yf8uTvbRp8F1wR5TqZG6rAtyn2bOU62UN7Ma0Ex5zCxj2pUUf7RmshOq)RduJL9tJW(2M6Z(Eudq)Eiuiz)u0o1Sy1cDiGdWYuCUvAnkQ9Qi0bXA0zQuPWMAGtxE9d2(JY(Z(deWwiiDOAOEhy3Z)7d4ONeB98vDktMAKPwDghUjsgMml3yKmHXOS2u1RAAFKAp9uRNMB7o56DRKHVk(3d
Brackehide Hollow
Yo, the MDT is so hard to read in this place. It's going to take a bit of time to get used to which pulls are which. This is to no fault of the author, it's just a very packed dungeon.
I've only gone right after the first boss, and I'm almost certain that's the best way to go.
The trash between the first boss and the tree boss is super good count and doesn't require very much mob control. Uncapped AOE and priority damage are going to be super good here.
Also, PRIEST is so broken in the first area because they can get the cages with mind soothe - this frees up the routing a lot. Basically, it lets you pull much less in the first area (bad pulls) and do more good pulls between the first and second boss.
So basically, the route goes like this -> pull as much as you can between the first and second boss (tree), and then skip as much as you can everywhere else.
In the first area, one person kick warscourges, one person kick the disease cast on the speaker, and you call kicks on the mystic. The reason is that the mystics cast bolts on random group members.
In the tree trash area, the rotsingers are the priority target. They spawn totems and have a disease cast to kick.
After the tree boss, I'd recommend just killing (or skipping) stinkbreath. I've tried a few times to chain it into the stealth mobs + warscourge just ahead of it, and it's gone poorly each time (kek).
First boss: call kicks and dodge stuff, kill even - very hard on high keys currently. Make sure whoever gets the bladestorm fixate moves out.
Second boss (tree): make sure on person gets eaten each time he does the pull - we rotated the dps. They can still do damage while inside (instead of running), so, like, it's a dps gain for sure. Definitely remind them of that.
Third boss - easy
Fourth boss - the totem spawns directly across from where the mob is positioned. So the tank needs to essentially "aim" the totem so that it's landing directly behind the poison pool. Otherwise, this boss is really hard on healers (and non-brew tanks).
No priest MDT (sheesh)
!fA1YUTnmqWFjts98ABVeua1GYGcKle1pOsDRQuGnvsApKV9sUlFSRTbkGsSLO0oZoZWv2impy0hoooEC)6K7pMbH0OF1A)L)Bg92dhwM)M905JlZMHQnQgJE94bJ(X)(8Hx)S(hp2oB0VSDA1gQZ(1tNSZU7xNMmd15Z1R7MSVyNGs(SFXZ(BEqq(N)WzgK0tu5t8x3Fw4OcoKHLRIlRGLZFbVJ6WHl8psbBON0sorVFzA5KrpoQSJJeI8qeDc1KjQrOqdGClfqjfqzcq)hD3a3aQ9wspN6mcUkQKutrVhqVdeaXgkjQOKOoHoVFv2CTs3zxPD6Uf6TmQ3hKSmKbusmOb7yz(XcLTPqJIdZnHXDEsbukwjxUpQZkox9spqSAqIqsHa7PESuTjvoYo)hcEAtssBqVlUDCJRLEpCqWICXgveLcrmeiIxxUb)Sj1KGEdxT4ScrYAdSXxQq62xPqSZJwqxfyaWtYWZiuzSaIacrMxP4sIg3kmIBc6HvRicuQo02UFhgHeByCxGkUONRU4wfrlJsqQTGpSjSO4j)CdVRQWRQqHtiyO7)cyJrFsEvhefMO(wSKel2kWqvHfYSrM3AfTthSkdEmLiBr4JtT6aNtwJdm6XDen8UQMZqfZMuMRMvriymzwfzKIXO0iQaF6WGehyMiNWNSLntcP5QbxfzrXD7Shbb44SHiJvfZNMYXr49Gu1Hz8omJ3ZOwn8uvXxmC1mTIUq7HEtjVx69KIvZumvCmWgecbcg6HkfWmvfkPn443wG3QAUWMt8q71zk7HkAkQt1MRNRkYJgqnwwLTHIH2umuj9vOxosTU4lUmjVCmQSpRWUcjvSxEQAzSaV2TMGQyVqoq0gZ1Zmvv0Ihfhv9)TEUIPM5xtMFoWUOPfmIjj1afVw4Odo6XrOBW)AsecyXLr)GbL5EXdhQIVuPsenpx(xc9P15NSlZ3D4n)YDgTZA)9X5Nm7m6Z2j7Ex43zv0F9PJJUVmoE26Y)KPybD238))RlRo77Fxz0l7(P)XpBktXUF7K15S3npUe85TRULpgUEaVpCX9a8bkS5F
Priest route MDT (niiiiice!)
!LI52UTrYry4xOveD1N7RcI3GfjbbklcnsaYfdiL0qlUHlPd5q713WN9TRQ6dvlQCtSbT04VzM(Vo1v10tW0hNw)Y(D72)81dlFB6rqpT(6(xMw)p(V)5h)R2)M6FB(606TV8YPJ)Z5Zx2F640JwLXpT(5thoD(N3EyEzz(VCC3jCL2ED50pI89h)00hEZZ8YVLF1PLP1Fz7HRZ4J)81ZNNpU8ZxpCiRC7FV(6thM)YmZoVF3YFF3UlZlxYVYJObVGls5z)txp(P5th5fpoTEzE(xrXFAA9L5dZpVGwm9E5p5x7ZzTAlu9h4hn(zb)XDiZaYqFS0h622YTn0TBxWpHd)SG)OBep6L)JG08Oa206D7mZ72jmNpwVwyoHQ4IL3jx(izhHQiliPAQDTqLsZIfU)iTGHrQRt60jsJi50GsAkwPP4QQp6JM52A57wyrlPjMWWbT0lnn8drL39f3TB3tznKrPLQzj9F8zmdrTK0jboZdAP)55LkmDxccgly0IcgkqcVFfZyOjNsEegQAkEiu8BOKtHcxR4F7RojLSjAprbqntHwtEPWc08kLFluTS3GEjgdYgj(oGPPfziuiOzx1SF1mEBDmgB564eDxRiavxhPBNEIRia1GTdCobsJrxptddMeve21N2h1J41mPA0RSm1WboagupFbLgl5j9DEqjWuIV9us1k2cCfw3k0TezBNsjDUq3DqEUkrhy5lnEIuMt7OmNorzoTF0RCJwOzinzMURDJWalvM2IfzgSioUZ2tKlKgfEiix1pqq)GrONURpupSygZ2TCeva7kwgBXMEYxwLZDHtuOkY14rUgpnyAUPsdBZ9XLHeN0hcdzV0uV6VT0TiMP0gqXsaSyCo0yilZy5qQN7Mgi724gdSTkEY9It99q9ykhNCt33(eATg4yCTJrl81R0VVfAZd513iQzf1nXbd0Zfh1Cf(0VTRRw)Mah31Y2kq6LA(EPMM70(2(LUETYslR8MEr4MLAwNEiojzgMjBcd6ZSEZ4ExDZBNZBEVE)Jpf6iujKXk18)vVqnmyF(M9TqLqYkyUSxluJdBb6tK(K426k(V0QzHPXPTC3GM51ROAryUlOvxkOOtKTm)B0IC9Z)6l328WTnxoDBZ3oD92Mx3(L5BB2EBZNpVF(Ys(p)HP1NE6xYhpRDwS1h4Rw7uXvuz06hm5lXTgziaRCOLGq3kAlDf67Wac1RiNfH0LPgm7XnkaDmQLoLwXZ7AyRa76ypH901DbHOaxKurvxi2qUe0XAbMKurxYscRW0ORJ9cCGX4LSK4JKd8VusnLw3Rk9aXG2hOW1UD8gGCe9bQn4hkBagJ((vjo6Rt6vro6NZdgo6RJPA0NH(om0myYWIuYl1Gu0Vq5OpL(4OpH)E8cZOxq5eALdMAnKsTsv8IGEfu8cc67WSxyZPrDXl8KRLAq2lyk6f2e9wSx49Khz6yRaNLZMJu2AnK3qxh64OaJsgdOKCnKNmuSgQI1cmkz0rxss681AOk2lWKKgcts60usp1WgvhBijb0OmKK20kEUvdBfyssfHjjT(v8aTgokWOKbY5TKKwl6AwOJ1cmkziIPwllj3vW1XEbgLmeqxWssAOgl2ud7uDSdyCErCKKgpkVZ0Xwb2XySHojPXIHnxOJJcCQH9SK0wzp0XAbU7LEssnzG(Ux69cCGtd4ObssnTb2NA4GQJdLCjUZHKuJ9n)E23zL77SbQsNxzdvoWjsDzFhdDnOVdj)qJb3yhMAqEFhtP9DCHk09cEFxbBfyhViX6(UCGd(U8zCk46J4)bhLL4NI6CJetiOJkT3Lct7EWsJn)PhIALZbbRlbGkK3QKVL7Tk9Xx3FjpEC7Y5thUT55ThVT5jCK5XJN(2(JF6hYdtF98PR55QNoFBZVC9YYTnFD7(Lvt9Vp7GbztbVfIwJnMvwbOQg2GcoWyvAqL3NOvH47Aq)RTNVKhLF(tZvZ6YQvf1c3Rw2jv5feaFEeyoG3vZ6nGl3tthDwTnx0XrMr1(JzF7y252F8l7V0C2FG92lNoT8kzgOxNV8YCXqI3zioJtRm(G2Qd2SfjmKS85YhF2eTGhcH31q48WDEolhDAY))kAA7qYQxNmb5b60jBZqQnQTaPdBvH(omVdbCrS8owGaTdPaPDifkUdbCM2PBQythBfyuoBFYeugEf64OaJsA9TjtqI2uItMQyTaJsAn0yhwshUiAxh7fyssf9ISKK86udBuDSbySVozsXdSmDSvGjj10Iq9bu0WqtOJJcmjPJgQqTEa(0dqhRfydhQI1jta1J166yVah40GRozcOwC2udZtMySJYLu7BEYubB6yRatLokQiYxWapzQIJcmkPNoHKV6LEEYufRfyQw1tZA4aBIo8KRJ9cmjzGgPvdSapzQG5jtmoamgQtMu0UJGPJTcmjjDWMax(qhNie64Oax8sCNJOIncDSOInAAHQixXsoFShyJEboWPb87CqsMpCgItnCs1XPY(s8lIrsMpCgInDSvGrjDKdNijJwAOyOJJcmvXg5JARkCS3Kce3qlVbv1g4XRvDdCZo6)cUEF1y0hcELZBIU8qUYmdSVQpPIUOccgWAtk)7oo5hFD7(JLM35F91tyV(BBoSDzM(QI5B8TA7wSD5XYO21FDE()mrFb5PF)d
Uldaman
This dungeon isn't too bad, the trash/timer are super free (even after nerfs). Bosses, on the other hand, are not easy. This is another place where some priest soothes' are going to be amazing. I haven't really worked those routes out yet. I have a route that does a BIG lust pull at the start (so lust is up for 3rd boss) and then invis/shrouds past the three timereavers leading to last boss.
On tyrannical weeks, consider doing the totem boss first with lust.
First boss: if you go the the right, there is a bunch of more free space around the back of the boss room. I usually go there after the first set of cannons. Also, ask your range to stand close to melee, so the ranged boss doesn't jump too far.
Stun boss: so, here is how this works - if the boss isn't stunned once every 30 seconds it enrages/wipes you. Furthermore, the stomps he casts (Crushing Stomp) does a big aoe on the group and can be stunned. Also, the dot (bleed) he puts on random players slaps - so requires defenesives/big heals. The boss will intermittently cast Inexorable - which gives him two stacks of a stun immune. The orbs on the ground stun the boss. So basically, you drag the boss over two orbs, then rotate stuns in your group on the stomp to prevent group damage.
Neltharus
Neltharus is a great dungeon. You really need good heals and mechanics for high keys.
On tyran weeks especially, consider going elephant (Magmatusk) first as this fight ramps in difficulty the longer the boss is alive.
Keep in mind, that the Warden tank buster slaps, like TOJS hard. You can walk away from these so it'll be a good idea to get a weak aura set up for this now. I think they may be more akin to the shadow slash in COS - you can kind of walk away from it if you know it's comming (vs use a defensive). I just don't like how fast the cast is, it makes it hard to react and demands proactive defensives...
The Bonesplitters have a cast called Dragonbone axe that should be disrupted/stunned. It puts a big dot on the player it is casting on.
The Thaumafurge mobs cast molten core only if there are elementals nearby - this requires at least 3 people to kick. It does a lot of group damage if it goes off.
On Chargath, make sure you have a weak aura to track the stacking debuff, slag erruption, that goes out when a chain is broken on the boss (exported below). We found it worked well to break two chains (stack the debuff), let it fall off, then break the last one. Having the last person be the tankiest dps worked well.
You can invis/shroud past the second blazewing before the last boss, just make sure to stay to the right beacuse the Warden's have truesight.
No skips "W" route (MDT)
!1vvxVTjmu0FottADc)bF9A3uLQMeRtKTh2dwqc2P0sGOGPT5f(TpFVxcysxvtjMR99CpNJV2rXuBu5v1gt9UHg7zvgJRYFvRF2nsLxwv11(h9P(6UwvMmqePY72(KENT3LxgLmn6UewquSmrYsLjbIWuL5gzOkJRU7MqEmZfHNkCFjJ4WusvMaYltQUvLfQY38yD)yX(HZJfWG(gT(yD7(V4g2nwCUBySyxz7yXtd92XIxlBEES4yjm(X6dUCmtlYX4pHbDpQTFDSqzv5TUIyHbVu2mObAVB40jDR9HHMgvw8875dBB0VOBq5F0n5SqXhwGV4yxooTLLGYifMiCAcwcodddgrjfFvsw4bfIJFea52110DsLBmcTXaRHdRj6cU(afHzfIvx6dhZdiaMu9cLJ8PzQh)zsyrzSqesweIplgTm38loqgtqIJ7BfKey(Ol94xe(Am(kNGgFvCLbnPI1gHqpxP4zM7P31fYx7PGjoZrwGp94beRzyECoP0qSX4sTnBD1EUOmsNemYLG(GsCHliqdjYfr6EYmPnZz3CY7SOXUowMyAZf(eI7urtANXVY4xwi6Pm5kSM4dop26LUYLHUeYLJvlT5ZCuUMDbxAjwVnbTzZLDnjPJdPijIVOMqA3AzJ8Dgcx512lEhJPdiP(jlU(mXInT0gNXwX80TK0D6Ad2wqIp(d5oTDYUCc0feoVNG5alKLIGHDyypJaTcS5Gr9A4XnoQloB1oPyH7S1n40mjRmb8wcOGFuZqicu0)PeSPLyX)UC533hA3R7AVV6nxUbQCRwFWDfSARkVx34U1h(zacmODo)uTX(tJPxV8ZbtaA1VHmD44HQXIBglS4T7W)vAtDBTv34UOFFxx1KGEOSrBT67BnDoyYlhSDFdId1)2RwdWpG75d1U0doF437)1FV9hrF2ft9V)
Blazewing invis/shroud skip route (MDT)
!TEzxVTTnuy4Fo7MfbXVjVTDRa9gVcOGT7eStSuRBvSdILAA2f(3(45C4hh5KbSHnaxx5hrYx(YZhsPx0FBF3(dJJhUFzA(L(nczF3YH99D)67n7Fqy8T7)J(UD73F64Vp805dNo2Vr3Q89DFF30Yam97xE6PHJZFAzAQFJP87UL7Mg((qKj67EmEZZXbVrGFrFJFKWN54LQ3GLrkKjiOmrLeez6YKJ)ke)XCCFCA60t9DJJQHXrGlXDlrbwyGjRhxTq)MOwUOh73yxPMgVVALA0oWJZXIdXfV)m8BUlvR8NjTqWh9QLJKWKU5AhOgGHQZhHZSLxV(4RnVbMzMnahbvLcRS2RTUb)yjZyyIQV6ShMIbNIIn0vojFWKmUfhGdVLh3UGYcjDjePfc8FZWyrrD8GR)QG74D0rdmw6R8iZtZY2m68sKhfpFiUqfdA52jWIZXZqWpc6isyjhLI7U34OYXMCGVQc6CxeEdRMNeB3kljG88IWqzmoEW1)MrI1(fsj0RsBYBnzlPhfGLsYDqDvDi0klPezjLeiTuy2TkSrBEsbDfYnsiffJd6wuEkfVg5l2NvOb7pACRtkGQfmDpWthe8KJC9tEk7eu4Vmf5k9ZvizTsz(skHkxlDvhN6ILdcRSefIf(IrYYcJIQM9f557F9Q1PghMVU5gmm9v7l0KU1HzrihMXDQy1oATnn93(6Uk2(RZq38gn4LRo(NlpN4xwo(5Hth)4(FepIA77MhgE4WXp3FxF35HPH7NHN5qtfob7E6W48VnoEEyU8aL8cc7RpTBAyEE4Jhhpb71DlZNEpWHL8DxngqsWzrn)bo)LhFy)LT3Cz7Dt7(ZHNJZ5Y2ZF7WJ9DNU7RXTsrXU90vFWlAToTxlcAFRYe6hVrJn6(WngPtejYGk(FAReULM6HaY(o8HL3(LdNVS9ZlVCzlCX5PHHhJY(ZXlpDz7lNwUS9(DhVS9RlNNVS95DtF7Y2h3bx)LdpeNZyAqXNp)tim(1H5MlBbBDmks6KpVHtXtrdl0s7KXrQJqS(6gpuGbZTBIMwNslBWm2UBugFtlm7mudqRObl(ZqBf6aOcMJhHUgSPFggR5luHOIrTCTn0JfkyndBQyupNQHkTkypdxLuIs6CnkmtVGLmCvsjkPVTHA0vWwg2vpIqj9kehkyvBfRshOqmaL07AGkhvfRzyusugfkzOfXUk2ZWGKQqd8ykuYGOH9wj)NZduMgrkpW7PzJqDkpikNMYdiOTcHnSYdxr7xztGYdiiLhqurnLJYdckWCIAshLhKWPGInNheXgYZ6)Epl(N6zD0jHKNvYg8HPrORrK8SY2GVoqgARqha9nQKNJXlYZji5zIkqPcWSipRnzpNXAg2uXOE6aIDvSNHd0MlKZ9nk8ArflzyuslMnJsA85C)m2YWo6isKZ9Tu5rOGPCFcRqjL4LOKXcFnL7NXAggKus9BOkC8OcY9ZypddskTaMY9DAaRfvSKHbjLAmZLAQ4rSPITmmkjMUPPkCmrvhkytBfBqjBbZBYv4q7rvfRzyqsraoyn56fa7QypdhkylvYyBIjTwrflz4QKwqsDBloetfBzy0LciSA9igdG2qb7ARyh6s0WojIdiwvXAg2qHbOtakPqbBqNRI9mmkzamShLu4aSxuXsggtFAXElOKcFd7pF5Fxha3R7aepP8uhayLLuhajwisYfsD9sqBf6OnSK6aaNI0t)sqSdqIsDaqxiYMRn3bGWAgglhfLUEAb0Wf9S9)dpRWSAQRxlOsTeL66HvrMc0wH1oc(60R9dOUEe9ApRIoY)ApNXOCyXj11lEiQYD9iSNHRnAPUEeM66ryjdRklc11J61lRssD9syhDezYD9uq5r6nrFEy4B94B62)xd
Slag erruption weak aura
!WA:2!vA1tVTnYvClRwyuJUDxRMyVTOBJBqZwSTaoRTxBeh00urBPyLylPssh7S1PudjhronuCMDMHwwbfOiohQVSaf6JGo0t9K(iOpbdek2J9qUV9GV3M(gskfNc7d1hKFV38M3879FwOAPoL8l5F(NnG4rJTOjCp8pzg3UOaATD6xPtGtNhxfFptpAeL)4IWF8EnA3wGLfgII9cP8MusS0D7k1TRyo2JsJ8PDJT6sy4wRLWJy3kukzI7F37QT5ke6D3PQ1A7KehGPXI7U6wCKNKaKBAkKiU8PUEjcjTZSN5tDe0Ky)WbavhSqGcWH9b6mfcntpLD)AXsmVnYdFCzFFWqhFig9IYjCK44M0UyEk5(yFc6yl9nehBuZUYk0Gadsmr(PQpyw1hf62gyeH5CNj5KGamx8d(uEo53yi7XWMiWARns)RGHJIi(IFP763BRpFJTCxFRn2CJnz3mrGRfet54kNc(MLwTA(HM4tWqGAxmksg(grIBkFtoUn5utRMv2BpJeaoUSiupm)cWix(6TotKriMFeq5rAt8oau30LkeRo1CwjTbZn0z7Yw2ow2LnTzLiPyrhfSYr88MXiiGo)aFSlCbBWV47w2C)QhSx)K4C)DE2c6mZjy7m(9P(4)(mxq0r7yu0tHGdK2E9fVaJzL1qsAIGezyFumPJMkEt13VQAjJyAmEegjWwsoooqgo3yFamAnC0HuUadLE(IZ06OXIAnJoismCx1AQ1Nt9fQnuBcK34)vcGFbsQTfoKFsgG(fdGyHjoqxs9YfvlngyDrEViGRZ9N)jSss8PshricQtpkVuM9JsfM(tBkhGVJiNqTw)PND77WyF0LU(2PnffkuO4BYKIJAN2oyu(a7gSFyQqucuScER3HeFzOrzG9IShICk2pv4RUI3NLt4wpPJlMZ(5xHgsshSteoa51ZPDeLYdhLQWFeAqiT7PMBaNkHGJni0OEJ6vgN1YoXTZzF2KOWv9g(qTwhuKdJde6aCb1sCiMQ1IT81bQouFhDAP1G0dF30J(5khlhu5uWMcrxup2p96StgxH8K27d3XtnvAbCJdS3Rg4IPs7s5(hYrSZomNilWCc4bUr4W8S4LgGPM79kmMgs(zxhYMgpk(oCyrEj(bSp76UIFpOTJ45idb)oegu2J9jxHUPfQPDgMPj1Zxs9RlOEau5)BMv9W0Yn1VvvwzO2wTZRu7vqTRAovn1JHUJ6xrkrcZKLe2Q589nibz1uQMpUqrWy)oLP63xqDO6i1ZAX(vxVbCjboXPxn)i2cLDD54tiqQoZMc1bQNQ(Yrq2OIPJrdB7g7RE(TupPGY(7E(n))Wta0T7d)2)9)z5zM5dlcup)5)53(2)17H20NQF2tz3OP6zHtEQcTvl1x35dPFmFC2)COzj1r5SEVR9nxsE9rRH58y)amBbRVkbXXlxnjkA5ddjs8KJfq(U45)4Po1TVJqvXuNR9Vg)caUojD5Y58MXpa8xDdsQ)9h6PS)tZmjeLLyuFjBHA1RpnQAw7r7ANgcoUO65pq72wf(MXbr0Uv54Vkbh71RzXpFL1Y6x1YhblvEuu(CRwNPfPBDmBctIIgOz3lDa9cd10t6b6hm5kPam9SJU8zwEOiCrdnzy67Bhs8Erm0B)9spFpcqVqQ9nsdCTCdXKGq5xBerr()T(aSCIH9x8qxjyQy5IMDsGsU5hcob0naBCi(ZQxj6CjbHgCAeEEdDwyr1RbcyjKMyOwXxcBDGTLTm9IqcHwmpxKrWxS(QUI0p1XL0Hr5Yb80fg6GHH(7GgsIZkWbHloei9Wv0RxfHd9jc9g6AGwF8SF4)KF6Kjf3yY3(ON2UdrGGcj)W1si(dFsTtTL7VZrn7ImrrSqurZU65(FTXlP0o6KeGhChia4U6kaZ9giPE57Z(4c)LVZTj(JTIqblxHNW0yIvcCXTZFpyXSPEd4W2CyRoSKfjrfViR4QQwK2TCT22SsL6JHTrG4gPwrmVl4fTjbZZjX6NdhoAItubQ8dv)1wd0RMjzAF2KdB1F6Mo1CLeMBSYgRSEPt(hh9F)
Freehold
Here is a nice W route for freehold. Basically, if you have a rogue/priest/lock you can do a much fancier route that pulls better trash, but - really, this key is so easy right now it's not necessary at all. Literally just press W, we'll improve this one in the near future when it's needed.
Your biggest issue in this dungeon this week is going to be people dying on Trothak (3rd boss) or last boss.
On Trothak, just have your melee stand on the tank, this will help them avoid when he jumps to grab the sharks. Also make sure to have lust on this boss (and maybe some battle resses).
Freehold = free key (MDT)
!vAvxpUTnqWFr2q8BXxVwKIu0EnO6qFuW(SPU6wfPaBP007b)BpC3vICPT7df24oXHK7oZSlPCRO9L2MJN66oDyUF6FBFwiBB(Nq4VJp12S)4XXH)iC(YPXH2N1vkBBZ8PJTn)0V2)((F3)ZdhcTnFDF)CaIZH5ZNddtFAUVV9zBACZ8R9HVg6XqEj0hombX7fyCCztPf(JZdVfgh(4XVfNkU)Pq4ZNgER912MZN6M(TUUlHPl0gFjUV4o)smxjK1)e)o1(Smni(y8BesXNxVmqIZcpPWh0WdX5nSf3CySF8CBtxNk01fxGLr)Nv1RlTcz1AQjqngvdNsmOeLuCojmCg4jcwHmex4kFa24dm(qI1vWklTDu0khpF58tGUBKQkKivkd1aKOWjRV3PJK9E3tf8O75FqLP(gEzWgQvQ09AKkqpbTi0ReUIrLbngg0Skdo6lIv1sZLCosyYctRgJIbRyUcD5jAI7wPsEtY9f67W4fTc54kKdR5quZPAsIudRQ030WqP6bljPWLUtxr9u4XnQlmZ6Kkx5cVTWZjpPpYOtPpRHL2dU2HwGC5QI1DM8aHKJQZOyaX9MySUCnS4L5SVS)52SvvyV(Lsp3E1ffFAdj1sdtoQCXNXLNfoDZHKFTsQBefZ0sNexowMm2lUPVXwOI6IkNUqs2hCTaDhJY9yrSCmKopK8ArIKmV2th1OYowJU56sio4EKPKXo5xWF5dUlr6zz))(MprQ1iznRE96Pb4RErylsAzZuIAVVhkZzvbxUvMqHrvvytwEWPpXxP9nCFZF5ZhVUBZ1DV921DH3xc1N23hMMcFCOBeAD2ppn(dao8sWNUznWljbT0m(6FfFJA6LGnht8ffXw6rS68eCMeUofpdgBk2udDfpbHPN2wJPUAl6xnBuvYT4lDIGYTyeiqngNfqBg0bG6T4PhauTvbLKvWOVMqfyQmBnO)aWMT092jyndgtNfsNGYNdxIldxZG9jyjMsrfKsPidlzWQmmMsHenGCkLwgSJiOd7vbyuAsFcwvLHvykvBJwTIsPfsPsLH1mymLce2Ua7Xtij4AgmKsNheSMsPdRrImSKbdP05asP1mytg2YGHu6maP01zcQ9jytvg2GPuJTfRQK9lH()1r6UVJmg66LosHhnkcCTJuGvDtc0MbrDib7IKHbCrFcK6ijuHifaQJuOGYPiNmQJCb2qwHFTJmclw6ixGRzWykTaJw6iH0N(byRo0hmcHQ2BSkVZyuXQq3gn6AFyJXQ1kTSo(pHT2GtPV1i)LtdHR72FECEiE9Y0FE6Y1Dhgppeodg6a6RWN2Vp
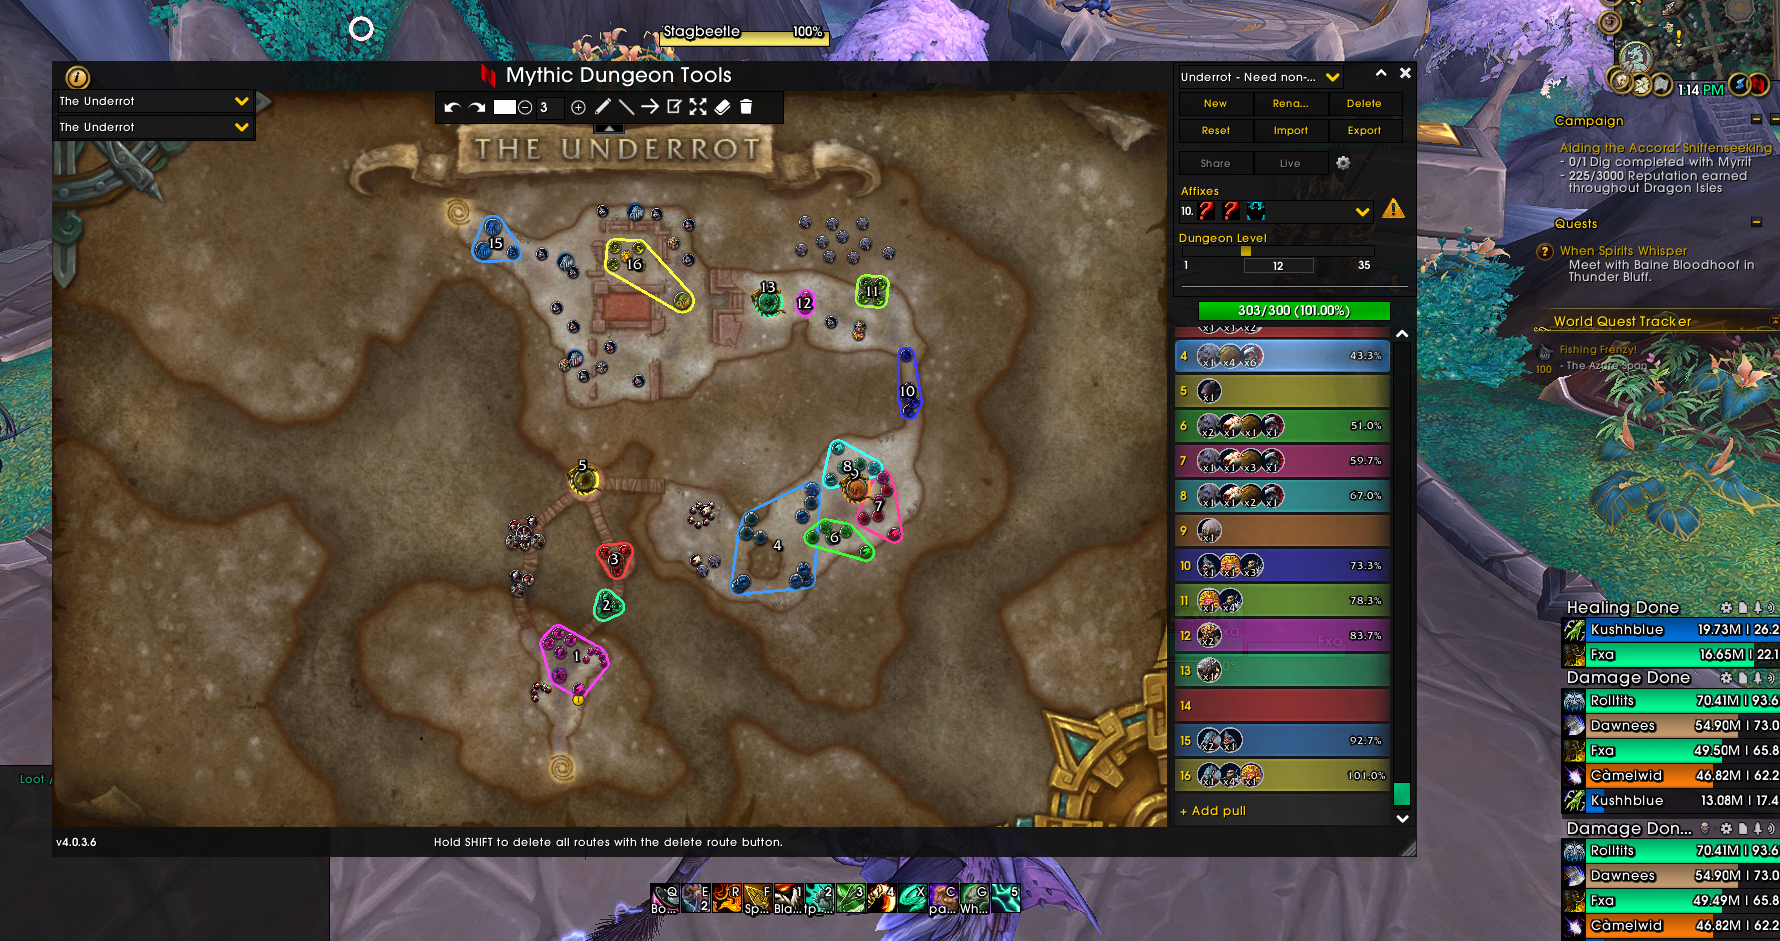
Underrot
Also very easy. Literally nothing to say. I can't believe they added the worm on the last pull... So troll.
The trick to pulling the cragmaw room is to pull one priority target at a time; these include the Maggots (need stuns) and Bloodswarmers (need stuns/roots). Furthermore, it only takes a single person to kick each lasher, so just mark them up and they're free count. If you're in a super sus pug, with no comms, and no dispells, then maybe do the W route and skip the lashers.
There is a lot of tech with skips in here to avoid worms and Faceless Corruptors - but, like, this timer is so free right now, it's not necessary yet.
MDT - super easy W route
!TAvtpUTnq0Fo9sxbrXVVMuSOlkG6cOGa0lewRnvwNQiTqwAB2l(3ENziTiLQp2eah5N4mV38MzOJJ5(IRz8LV7poFbESM((PWt1CRQqj48sTXYvcxDLR(bH0wWkTIYkHc(aofDwH7tUAPRPP9TF96HVVCz(6H36B)46H5xpF56HZDxp8X4Y1dNgh(f4DV2(U)6H2RhoE0n7AgGWNrcYPNiKvW2Zrh9hxTcKJXvRPyB6dH1aYQqIH28aVIxOWObqtHfZacQX3lxbvjqnaQRkGKAiqlsUDfKvMqzivAtrj8iXfNHzGXtWImyKotfbt8X5eSobBYGrknsuCveLCbwhvSeCvgmsPTSa9RaLYcSzjtWQmyKsBiqtgSDfMxMG5iLwlkqEGsvb2Z5jyrgmqPSKtWQimMqDc2KbBrybgOir5mohW)FyoqwYOcl2eOObqnAibnxvOP8ebvjquWSkSvKzr2vqwMdXiQmeCGlnnQWtWImyzOMvRZbg4zQMfz18JABvPGlT8sMvRbZS7bbvmp(GuA0Lsy3uymMsiHHxT1A(YRt(2t4YhSLn49N6H)9v)KpTSbp8pE)FhQM2tWE5x9txopoGTdS9TC(KR5VEQt8z2XX)43p7AEVTFXJY84Y0KFy(5L((WqCeOz5LE)7(EQbmDUB(p76U4JxTucFs0gp8VTm8n)4WtN(zyEE27)X5HV5EX1CX3d3iHAjmcauaX9gq36Tu3(O2sJhMGduIwaoqqlZXBuOmCBSA9lI4xQcJxu8C8fYSt1CCSFCch14ECud2mJVmegfqv5AeuQkdnuIA56qCMy458BZObjX6xL6TGLiI6EINUORwTtPC)6zQcUoyg3Q2z0SY1BvS0Rf7fJDBnJlN12mzVAw33Y6Ejie19esGBzUCe59i1oBbsvqjzAiU5qPuNNeZg7bNk4HtVME9oldC910QdP1KNwEEAnuA155ZStUOXzZE3QQv31QSrRIfgLy59A26yBv2rC76E50VFwnERAmTS8sIs(Mzy(gs0edH7xKXLRzskuyS8ASo0EUPJwg11UD6eXYmSunKNn7wjjC)NnXKVOVJHM2JyHnfruU8nkmTReMGtmQ2y83DRy7kOyJ(zSOJR2MwDULNoD5glpmDzZVqJX2y6I7uYX1TKlFRPRxnGTn964K(T0UBzBM(lCP8pXFOyC6hW)jU2j4xrUmc)SY0iCZFiINB79ZZ(Ng6gH800Ump(zehVk)t7odEvp1mpDUR78XL(5pCHXA3)(d
MDT - actually decent route
!9vvtVXjmq0Fo9stegBm4JDBVKd1nsonQNSGfmjKsGvGzB2l8BV(dWytrv7ke2EM38M3mdMd4pXzvn11nLtTYBCkiMZ(Jq8B1BrCwrvvF3ZIHXM(ooffbXCw)53eLYrLJuJ3D8tkiSlPqc(EmccJsZiqmItJ507qjK7breuumcREOSYyls5inHZyfx(8C(BtJY58lTf3MZLV2moN3upNFRFAoxXHpPo71IRI58I58YsU08JDTODsOjr50WGOt(4uBRg411SPZTIRIwD8yxuh6O96dkXWXmlPI0otXAArtvbqDK1kGEb0FbAzrS5pW4puFqINvSY(2(boRUgkQRv7rwp06MXH4iNhgOIm5Mn0RGb9jd0p(eVWOdcr4O6QZj6DWhr(eteX7yku4SXXTy9wP(lYcyD8IaO1VqkrcZCBpHrCjbLGKv3rMxwPMHWoz9yXT(SLYyhL9ilybDpkJ8RM4DcOcklB9yi2YbdKP(GKfiK6(hO1Ah8P7exv9XbBQf2mFyH(WMTjwq3wH0vlUeVZCSgFOurwKkGTWc87kaUg8ypt47QW(HFFxnYsGfyb(PKbCPb7Ncqp1aTROJcRifaVkYAosxkpBtoWLahhe4e()zeK45WwcgG6A6y1L0de0TjoGDMcTKD2S9FNQSDWBHahi8ho5eoSAA72u8LPJLQ9AIJ8v8TGLgi82MlI)x(aGGse6GmEzAZJc2VxjDF09BtDVi67EO6dvauxNifI3B6EHFMZgfTQ7o0xMSXt2qtT8h11JILlvSZVgeLIpup)zxLyyOxDfWDZ5uHOAoVRV7UY(3pxinxhyj3JfTcPu8qxDVccwXKS)R691b)0oB0KZe9PMko70xkHpNE5xN((GAp(F)d
Vortex Pinnacle
After the nerfs, this dungeon is super doable. I'm playing around with skipping the Armored Misrat's at the start because their aoe is quite unfriendly for melee - though it's not a huge problem. Also I think it may be good to skip the pack of Skyfall Stars - especially on fortified weeks.
Right now, if you play the bosses well, this key is very timable.
First boss is all about kick rotation and dodging stuff. We haven't had any issues with the Lurking Tempest casts going off - rather people puting a toe into a swirlie and dying.
Second boss is hard for healers, but seems much more managable after the nerfs. Just heal and dodge circles (and pray).
Third boss is quite tough, and is still a bit overtuned even after the nerfs. The fight is fully scripted, and the add spawns at 0:18, 0:56, 1:23, 2:00, 2:28, and 3:06. It works well if people hold 1 minutes for the third add (as they will usually come up half way though killing the second). On a high key make sure you have damage from trinkets or cooldowns for every add. Two adds will spawn between each triangle.
Dragon skip route (MDT)
!1vvWUXjmq0FN2djcBJXW10kvLdLgjIAZjlyxSt2eceb2Pjx4BVEgByn7UvRxemJN3mVzEgKe59YQ2dA9H92oZNYscvw9xL6f3DjYQM22H(FRgNom0llttyzYQHDpR2BMCbwIr3lVXbH)XskLCntqe5jcMiN6milVIXZUoHW488KKKIuzjd3BQlWsUS6NnVOMRNSJURMb3DgB)CDLPzCAUw1m295C9oLEa9)KY90(g3gMEBu10kn4VQ3B6SkOC2Bhhv9M7SDDq2xEUYURt9UQdYC14bT5xA9KkqJe3veLWM)UT)r1q)TTFilfczLrPE9q)JYDYQjvNJ9q7iqyiS3CjBTHussd(Yqih6ggLvAntP1oZ8GtmwyXGLXzGe8KJ1IZ19RrdXwOI2tkgQaJodJMJC4yYz4o8nBUhr2A1TTUyliJ7k9c7IPkWQViKK1nZ3qypHiBGxVdHNVw4XuLfIbXkdnU4IVIfOjx6zMnTehYgOlC)g6GnkwOsPBknMpt5OXS)dQoIA8u9iQfilelrKe1(ZXUCbwXUoHJgq2bNUKdEjKLCIjhvBHhXSaikqaZdtRY0TIhye5RQq7HSTqkwAdOTmFNJhjlwaQHGnTJtmrOMON0dHHDEu)zf9LrmuOP4IJluh6LIfYZvGlswF2yYZL2XtJiDCujW3GlAk9cJWGIEH8RyqJXWF(HlpxIZoPoW6AvaMhrFAuhGK5h8cCuYXrjnbLf0L5eeOpsqyqtXgrjPajR)pi6zE0iC5zhJmygI4K)qswmZYwpsvE8vbx6ydjpMz0SifiJgPPzEqbkac(Kfnn4oyNeOgLhUN5)tfEEjcul3tnAXjJRcFbvetT01dSRJKnKIggax4Sl(QCJ6d0L9TxBNRVY9jKr7tZ1pBNmZ19Qrn(XeN5HPj1uaK7A6ugJ62E9airBSMHVb2Hx(FZj7b(4aME7Hwz1x(Zd322)JV2)aubY)b
Star skip route (MDT)
!LrvtpUjmq0Fp9qLcG5RR9JdRQK7kruo0dJcjyVIUSqey2U7L8BVEMXgmefsKTZmV5nV5HHi4iu10Q1TxN7mFcYOyO6Fk1R2vqvDtZq)j14u7qpifhskGQ52gO6lL)5NFEQ6xNK5q171DZkeNRZJJQEZZZDD20txoOA(sN6DvhH5yR28BTEszMS5ircySF8X(J5(xud9p18biZTGBuQ3A7FbUavtQo1vdsfkpSc28UzR2cso4KrUnYcAxQBxciJxxGfDOByeQ06eLwB7qo7uhicxAzedTzCm4WuclbHvsawisLQakKrbMtbkyKsO)Yhqm9KSJpjQaIl2WhFoewInyL66qdnj9HhYUsStDn5A90xO6LSiuHaSsqd2oh30RyE5(kj4YtscMpQprmTkjLiNEkONOdmIu2fl1YGXgkDP7ugR6A8j477sUWh2niWHA(QDHIjBJwMZCOCJAusQr5o5MN0yl5gJ2YfQfShQiq19orFm1r70RaKjyrHkL2MTy78JHhhMH2w))j371zmscXiE1dc7ChS3D1251)ajleEb8OPve6Hs3mjDww2wJTvapisj244eWdg3falCVvXaMbpAMxCVCTl45h7jlzzMjMDmsVEEGDLrEVkEo6HXtItDRt4VX5KGG5r(QcIeY4sIq0fAg1he9NV9wZ9ZF9(5jt9O93xBVD)84WSr5O8Z1DkJr9uVEaBJ6zZW3XZXR9(2UyWRfjzz4YFTxgob8TNW))d
Neltharion's Lair
This dungeon is much easier after the nerfs, but having a couple poison dispels is really really nice and makes 3rd boss a lot easier.
The biggest issue in here with trash is the Rockbound Pelters. I think skipping as many of these as possible and avoiding EVER pulling two is the only way to do it (especially on a fort week). This requires an invis or shroud after the first boss, and I think it's very worth it.
First boss: it is CRITICAL to kill adds before the shatter goes off. Also, watch out for the poison pools - they do a lot of damage (even to tanks).
Second boss: can be quite hard with melee heavy comps. Make sure to spread out around the totems after the boss does his minigame. The falling debris can overlap and easily kill people.
Third boss: transcendance is great here, just put it in the back right on one of the egg stacks and it will prevent you from getting pulled into boss regardless of poison pool drops. Port is up for every boss pull.
Last boss: definitely the hardest boss in here (assuming you have a couple poison dispels). The add always spawns in front of his left hand and the molten pool always drops in front of him. Start by facing boss on the right of the room (left out), have the group bait the crystals near his left side, then "aim" the add spawn directly onto the crystal. Have the group spawn the next crystal on top of the add to re-stun it. This lets you keep attacking the boss, and killing the add with cleave (esp with lust up at the start). After the add dies, face the boss further towards the lava so that after magma waves the lava pool won't be in the way. This lets you keep facing the boss to the right side of the room (and left side is towards the group).
Pelter invis/shroud route (MDT)
!Tr5wVTniuC8Vo7HLiJbBJFAsDBvQV4wjQwFdLlgA8MRDKdoT9L8zFCoCjK0OyfBGZLF8)ahjr(Su02P1DBN7nFkBYZKI3vQ)jBisX622XH)OMo0noiByz0sPyURvk0SYV9YVVBQ(LhLIJR7NvqC2opnPgmpn33lBkIJfZB6vhv9yiN60Mh16dkZbRlnq(n2FbB)18WRQXHhA)q2WLcJs9w3WRYnsXbvVARbabDZgFRx7TPkgNWFWto(qTqJpCW(MAztj(rfUehhwddnG5x6SbSbGZ6)ZjXKatv4wP09QcFj2o2poz1gnvP1jH0h3sN7UCt4ixKmKhROdOKtq0ieKT8CeosUZmc1TcH5NR2pxrcQfxHkKkAGu3UZZBCa35zT7LntU3Kl2tWoQwfsuyvi)phIrmGyicJsffQkYzDKZO8ffAY1OEgspDNPQguAptORjXMIAalHZOarstppDqmu5xaVEdaFDczrnn4rr4ex8qx(fQrfUohxV8kPfcoHLUVdPIJE5pZWslEuheUHSlRhe)5tQ86dM2IydtEJkEuiOrEdbQ5lxPUvPWks6Z3vOPzGLOWX9wkQbpotAnk4bhDzS8gkznQ0UB1e3Li0G0780ieMi5N5gVSc3MUH6BnfCO6Y6oE8jeG1eF5RoYQtMad5Fzo3pBFTpWD78(3ApTAXPv7v9gBF2VFA177(8h(O)06ELXOEyqpczC9Sz8NW8qhX7UYgOHjitIXn)12Nm2uu06(6EolJXklQOfSSYQsQuVGHCD)IQkAgNuvuXlP8CwPFjQN97WM5IDtJZwyhNoTQB4y3HtR2PMGEcIbRjgx7Uq683(iljxhhT2DsXwQwWHAf4RO35MGLxTePsSGLXxMbEJtIraMSA5zDu()p